Wednesday, May 29, 2013

Drywall - Are We Done?

After living in a house we've owned for the last 10 years, it's hard living in an apartment.  It's not "our own", we can't spread out beyond our tiny two bedrooms and when the internet inexplicably stops working...it takes 5 days to figure it out because we don't own the account!!

But, whatever.  The drywall is in.  So who cares!?

Before
After

Yes!  So amazing.  I had tears in my eyes when I walked in and saw walls. 

Real walls!!

Powder Room

Behind that ladder is the powder room.  The circle in the floor is the toilet drain.  The rectangle on the wall is a niche where we will hide stuff like toilet paper, hand towels, etc.  Tiny room, tiny storage, make every inch count.

Storage & Pantry

Next to the powder room are the two storage towers & pantry.  Picture a rail running above all three openings, with a barn door covering one opening at a time.  You can see the outlet openings where our wireless audio system will go.

Pantry

There she be, my favorite part of the house.  It's 4' by 4' and I will be hanging out in there most of the day, for sure. 

There are outlets galore for all the small appliances: microwave, toaster, coffee machines, docking area for iphone/ipad/macbook, etc.  There's plumbing for a small bar sink.  And we're planning out the lower cabinetry for under the L-shaped countertop. 

Slider

There's my other love.  The slider.  I've never seen so much of our backyard!

At the beginning of the project when we were leveling the floors and ceiling, we discovered the ceiling was 4" out.  Big problem for the big slider/transom.  So now that we're framed and drywalled, you can see the brilliant cut out in the ceiling.

A Little Lip

The ceiling stops short because it's about 2" lower than the height of the transom.  There's a recess -or a "lip"- in the ceiling before it goes straight up.  It's going to hold feature lighting (that will only be seen directly if you stick your head way up there) which will look like it was planned the whole time. 

I'm expecting a sort of backlit glow...it will look amazing at night!!

Livingroom

It's kind of hard to see here...but this is the livingroom wall and those are the niches.  The one above is the decorative shelf.  The one below is for the TV.

2nd Floor

And that's the 2nd floor.  No, I didn't have the guts to climb the ladder.  TOMS are not work boots, as my contractor says.

2nd Floor Staircase

And that's a shot of the underside of the 2nd floor staircase.  We made a late decision to replace that staircase, too. 

I had a line for where the budget ended and it was at the bottom of this staircase.  But after we planned out the main staircase and railing along the 2nd floor hallway, we envisioned ourselves wishing we had addressed this staircase, too.  So we are. 

The budget line moved up a few steps, but that's where it stops.  No more adding on.  DONE.

If only because I'm racking up points at tile stores this week.

Hardwood & Tiles

With the hardwood acclimatizing in the background, the tiles are piling up in the foreground!

Bathroom Walls

Can you see it!?  Long and lean.  Wait 'til they go on the walls.  The layout is going to be gorgeous.


Entryway & Powder Room Floor

The tile installer said these are the largest tiles he's ever seen.  The largest piece of beautiful, that is.  Steve was in love at first sight of my iphone picture of the tile sample.  I'm seriously in love in person.

Sooo....now that the drywall is up, things look so close to finish.  Are we done yet?  Can we just move in, please!? 

Friday, May 24, 2013

If I Could Save Time In The Drywall...

Pssst...I'm guest posting over on 4mothers1blog.com today for Brothers Week!

--------------------------

So...that thing that people do these days when they're renovating.  We did it, too.  A "time capsule."

I didn't really know what to put in it.  So I thought -- what would I have liked to find when we opened up all the walls?  Something about the owners at the time.  Something about what was going on.  Something more than nothing (which is what we found). 

So I did it.  Here it is.

Family Picture

I had to include a family picture.  Thank goodness we randomly took one at my brother's house for Easter.  The fact that everyone is smiling - or at minimum looking at the camera - is a miracle.  Thank you, Bro.

I also asked the boys to write a letter.  I had them write the date, their name and age.  Then something they like to do.  And anything else they would want anyone to know about them. 


Jake's Letter

In case his scribbles and spelling is hard to read, here's the translation:

May 21, 2013
My name is Jake.  I am 7 years old.  I like to ride my roller blades.  I love the Packers.

a) He must be learning about the possessive form at school - what's with those apostrophes?
b) He wrote that last line all by himself....!!!  The tradition is continuing!!!!!  He bleeds green and gold!!!

Henry's Letter

Again, scribbles and spelling...here's the translation:

May 21, 2013
My name is Henry.  I am 5 years old.  I like to go to the park.  (picture of "our wall")  I'm smart.

a) No idea what wall that is.
b) The backwards 'S' is a sure sign of smartness. 

Actually, the "smart" line is Henry to a T.  His literal interpretation of things will serve him well one day.  I have to believe that.

George's Letter

Two year olds can't write.  This one can't really even talk.  So I outlined his hand in the middle of his drawing.  Cute enough.

Last but not least, I wrote a letter.


I wrote a bit about what I knew of the house before we lived in it.  And how we came to live here.  A little about our life in the house and how much we love it.  And why we did what we did. 

And three undeniable insights about living in this house.  (If you lived here, you'd get it...and you'd agree)

Our contractor put the time capsule in the wall this morning.  I also slipped him this to throw in there, too.


Come on!  Can you imagine opening the wall and finding this one day!?  Priceless. 

This is definitely something I wish I would have found....!!


Tuesday, May 21, 2013

Extra Extra Extra

Sometimes when you open a can, there are worms.  Thankfully, our home had no worms.  Just a whole lotta opportunity. 

Opportunity in the way of light.

Is That A...

Yes.  That's a shot of the flat roof over our 2nd floor.

...Skylight!?

Which is right above our newly reconfigured bathroom.

Skylight, Window, Tub

That's just been sprayfoamed.  And vapor barrier-d over the long weekend.  These guys work too fast for me to run in and sneak pictures ;)

We didn't plan to have a skylight in the bathroom, but when we opened it all up, the opportunity presented itself.  In the form of a budget-friendly add on since we were staring at the underside of the flat roof.  Say no more.


Opportunity also comes in the form of laundry.

We recently finished our basement with a lovely bath/laundry room.  It was life changing.  But if our life changes someday and we rent out our basement, where would we do our laundry?

Electrical Rough-In

In our current 2nd floor guest room and soon-to-be-toddler George's room.  This is a picture from a few weeks ago, showing the extra washer and dryer electrical boxes (the two in the middle).  It is now wired, plumbed, sprayed and wrapped.

Plumbing Rough-In

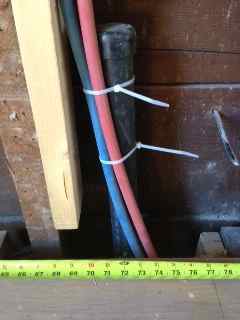
But I know the extra drain we put in the basement wall 2 years ago and brought up through the main floor wall with this job (along with water feeds) is exactly 72" from the window wall. 


Last but not least, opportunity comes in the form of a 3rd floor bathroom.

Waiting Under the Sink Room

This is my obsession.  A 3rd floor bathroom.  It is not my husband's. 

We haven't figured out the 3rd floor.  We intentionally left it out of this renovation, as it is the subject of much debate. 

It is currently two bedrooms, one George uses.  He has the best sleeps up there. 

We toyed with making it one big master...but we like being on the 2nd floor.  The 3rd floor feels a little too far away from the front door.  Hey, our oldest two share a room.  Maybe one day they'll each want their own space and we can throw them up on 3. 

I think time will decide our 3rd floor for us.  But in case time decides we need another bathroom up there, I'm ready.  The extra 3" toilet drain I put in the basement wall was brought up under the master floor at the shared wall. 

Just waiting. 

Tuesday, May 14, 2013

How To Find Brick From The Early 1900's

How to sell our car?  Craigslist.  How to sell outgrown baby stuff?  Craigslist.  How to purge the house of still-pretty-useful-items-that-are-worth-something before we renovate?  Craigslist.  Where will we live during the renovation?  Craigslist. 

Where can I find red-orange clay bricks from the early 1900's?  Craigslist!!!

Remember when we had that great idea about exposing the brick in our sink room?  Still a crowdpleaser even today.  Let's have a quick look back at that winner project.

Sink Room off Master
Before Exposed
Surprise!

Yup, that's the pipe.  Totally surprised us.  We think it carried kerosene to a light fixture back in the 1906 day.

Feature Wall

We decided to do nothing with it.  So it stayed in the wall, carefully balancing chunks of mortar.  

Then we decided to renovate.

Here's that wall through the master. 

Moving Month

Ignore everything everywhere.  And here's that wall after everything was demo'd. 

Uh Oh

EEK!  The pipe is gone.  I even didn't think about it before I saw the hole...but of course that pipe would be removed.  EVERY OLD THING was being removed!!!

Now what do we do?  We turn to my contractor's uncle, of course, who is a mason.  Except my contractor had his own idea of replacement bricks. 

Top: His Brick/Bottom: My Old Brick

This was it.  His closest match.  He knew people who knew people but couldn't source original clay brick.  You can't buy this stuff at the corner store.  Actually, any store.

So I took it on.  I googled for old bricks.  Surely there's something available somewhere.  What should pop up but an ad on Craigslist for "Reclaimed Bricks from 1910".  Four years off?  Bingo!

Cut to me two days later in the backyard of a house on the East side of the city.  Digging through a huge pile of clay bricks full of mortar, dirt and bugs.  Pulling out ones that looked like they matched my chip.

Chip Is On The Bottom Left Brick

They were from a chimney, so many were burnt black.  In a pinch, that could be sanded off easily, but I found enough good ones to take home and test.

And guess what???....

In Place
   
IT WORKED!

Other Angle

The mason, who speaks very little English, said, "Same bricks.  Same factory.  You buy 649!"  I couldn't believe it either.  Total luck.

A few days later, they were in.

After

A little bleached mortar did the trick.  It will never be invisible, but it looks amazing.  Even better in person.  Especially when I think about what it could have been had my friend Craigslist not come through. 

Here's the before and after. 


Not bad at all.  Once the settee is back in place, you might never even notice that Craigslist score.

Perfect!


Friday, May 10, 2013

Framing The 2nd Floor

We passed the framing inspection.  High five. 

Time to check out the 2nd floor!

Before I continue, I have to say this.  I took a million pictures of the framing.  It's sooo hard to capture it.  When I stand in the space I can see it.  Then I take a picture and it looks like a bunch of sticks everywhere. 

So...this 2nd floor tour will be a "before" and "now" of various angles of each room. 

Starting with the bathroom...

This guy is at the top of the main staircase.

Before
Inside Before

Pedestal sink, toilet and shower. 

Now
Inside Now

That's space for a tub under the window AND a shower to the right of the pony wall. 

!!!!!! 

Since we needed to demo the whole floor anyway, and reframe due to 100+ year old studs that crowned every which way, we decided to cheat the guest room out of 12" and give it to the bathroom for the tub/shower combo. 

See the recessed floor in the shower?  Make way for a trough drain.  The box in the wall of the shower?  Shampoo/Soap/Razor/whatever-you-need-inside-your-shower niche. 

Another angle:

Before
Now

That pedestal sink drove me crazy.  You couldn't put anything on the ledge next to the faucet or it would fall in the bowl immediately.  Now we'll have a 5 foot long vanity with lots of storage and one centered sink.  That means counter space. 

The box on the wall is a niche - picture a long narrow mirror running across the wall above the vanity with that left section opening like a medicine cabinet.  Yup - we're loving the niches.  

Moving on to the guest bedroom that we cheated...

Before
Now

I admit...it being tinier than the tiny room it already was makes me a little bit nervous.  But still being able to fit a full sized bed (with the head on that wall with outlets) means I'm ok with it.  

Let's see the boys' room...

Before
Now

...so yeah, we cheated a few inches out of this room, too. 

When we shortened the guest room along the bathroom wall, we widened it along the closet wall that's shared with the boys' room.  It wasn't much at all - maybe 6 inches?  But it made sense from the point of view that neither room felt way too small to function as a bedroom. 

I'm good with it.  And the boys won't even notice...!

On to the master...

Before: Entry to Master & Sink Room
Now

Before, we only had the bay window in our room.  The other window was in the "sink room".  You know, that room with just a sink?  So we decided to remove the wall and door between the two.  Now we get all. that. light. !!!!

Before: Opposite View of the Sink Room
Now

Oh my, that ugly little vanity and mirror is a thing of the past!  A distant memory!  How excited am I...!?!? 

And since we're reframing everything, the plumbing will fit completely into the wall.  No vent bump out anymore.  It's the little things. 

That's it for the 2nd floor.  Two rooms merged into one, two other rooms slightly smaller and one room bigger.  Hooray for reframing. 

If you want to see a few more sticks, here are pictures of the master if you stand in one spot and keep turning to your right.  Because the new master was two separate rooms, I don't have 'befores'.  Don't get dizzy.

Sink on left/Closet on right
Closet on left/Headboard straight ahead
Bed on left/Bay Window on right

Get ready - we're gonna trick out that bay window.  It's amazing what you can do when you get back to the bare bones....!