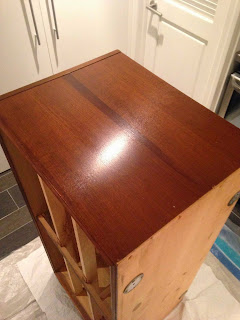
That's the first rule I've learned in this attempt to refinish and paint a dresser. Since this is something I've never done before...but I want to share what I learn along the way...actually calling this post a "how-to" is about as positive as I can be.
Speaking of positive, let's look at that inspiration again.
Yes. Still love it. I can totally do this.
Here's where I started. Which brings me to number two.
2) Do the prep.
After looking online at other blogs, product reviews and how-to's, I decided to go with this stripper.
It's safe to use indoors (says it right on the front), and it had pretty good outcomes for smaller scale stripping projects. That and it was waaaay too cold to strip outside.
I removed the drawers & legs and we hauled it into the basement.
Our floor is ceramic tile, but I didn't want to take any chances with stripper. You can see there's a blanket, a doubled up drop cloth, a layer of plastic and big sheets of thick tissue paper. Soft enough to support the dresser, thick enough to keep stripper from penetrating.
And I cracked the windows.
Now for the fun.
 |
| Before |
 |
| Wait An Hour |
 |
| Strip |
 |
| After |
3) Follow the directions.
Didn't that look so easy? I got ahead of myself, so I'm missing a few pictures.
The bottle says to put it on thick and keep it on for 30-60 minutes. My trigger finger got itchy, so I used a putty knife to scrape a little corner at the 30 minute mark. No dice. Still a very nice coat of finish on the wood. So I doubled up the stripper goo and left it for another 40 minutes. It did the trick.
The trick for the edges? A wire brush. Mine looks like a little toothbrush. Don't wipe the stripper off, just start brushing the edges like you're brushing your teeth, the goo being toothpaste. It will become clumpy and gummy on your brush, just wipe it off as you go.
Now get ready for the big stretch.
The top. The most visible part and largest surface area. No pressure.
My biggest concern, and reason for refinishing, was this little lovely...
Ouch. Right in the middle, at the front edge. No hiding that one. But it didn't seem very deep, so I was pretty sure it would disappear once I stripped it.
I applied a thick layer with a brush, smearing and dabbing along.
Surely that would do the trick in one layer.
 |
| Yup |
 |
| Nope |
 |
| After One Layer Of Stripper |
Dang! Maybe it's because it's the dresser top - there's extra finish due to wear and tear? Is it because I'm using "indoor" stripper? Do I chance it and leave it on for longer than 60 minutes to reeeeeally penetrate?
Fast forward: this was my third layer of stripper. I don't know what was on the top, but there was lots of it. Even after using the scraper AND the wire brush I used on the edges, it still wasn't completely gone...at least that big scrape was.
But before you bang your head against the wall, just remember...
4) You will sand after you strip.
So I called the 3rd layer my last and moved on to the final side.
While that was curing, I ran outside in the cold but sunny backyard to play with this.
I've never owned a palm sander. This guy is amazing! If anything, he might have a little too much power for me. But if I stay outside with him, I'm fine.
I'm fine with anything that can sand all six drawers within the one 60 minute window waiting for that last side of the dresser!
Do I wish I would have just sanded the dresser instead? Heck yeah. Do I think it would have been easy with all that finish on top of the dresser? Heck no.
5) You can't learn everything from a how-to, you just have to do it.
So that's what this project is about. Just doing it.
And I did it up to here.
- Dresser is stripped
- Drawer fronts are sanded
My "to do" list is longer than my "did" list, but I'm still staying positive :)


No comments:
Post a Comment